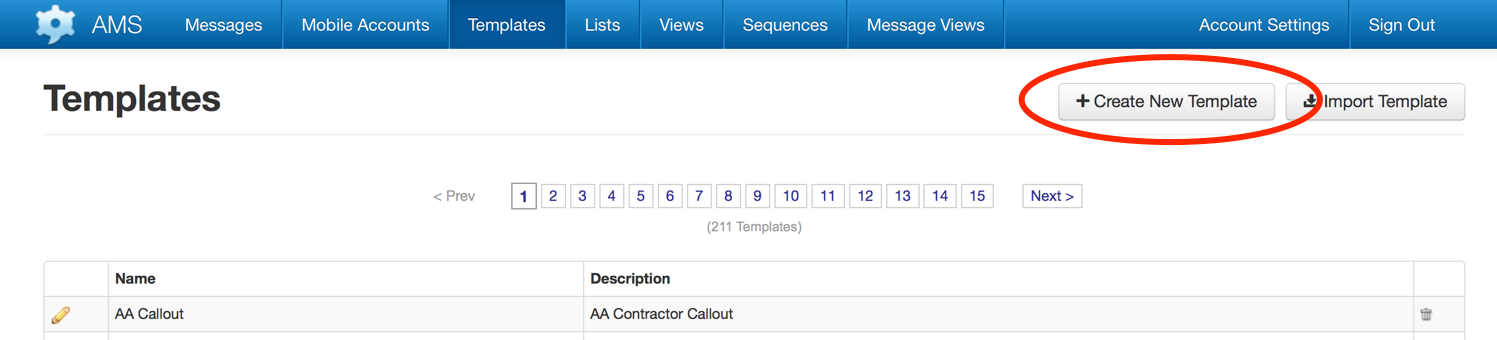
To create a new Template, navigate to the Templates tab and click “+ Create New Template”:
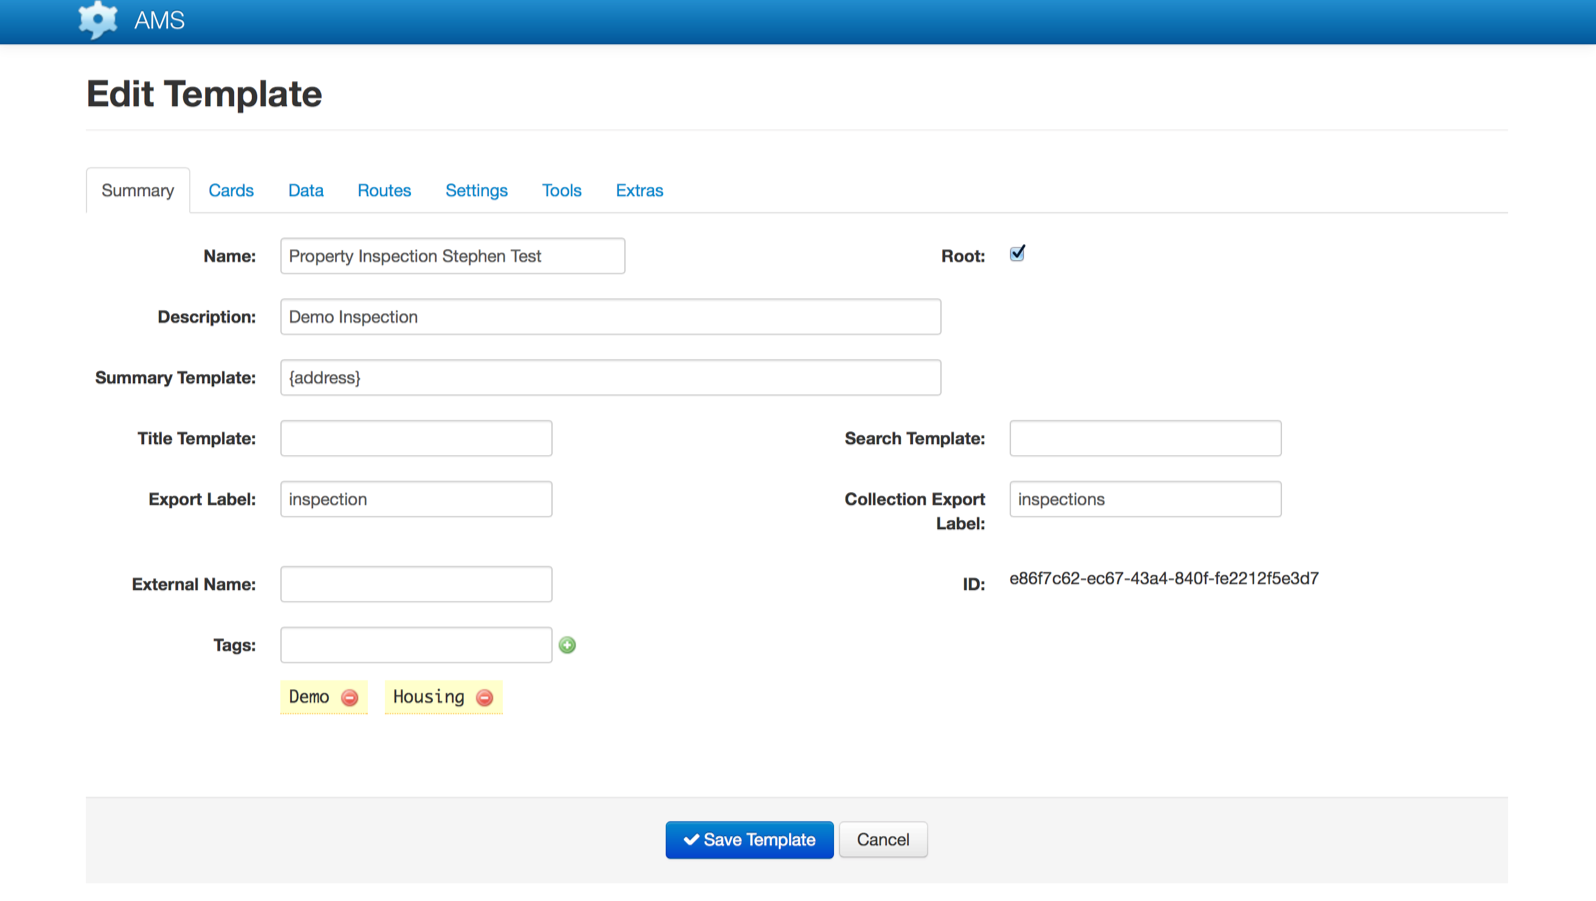
Transsend will take you to the Summary data entry screen for a new Template.
Summary Tab
The summary section allows you to setup the base information required for a Template.
| Item | Description |
|---|---|
| Name | This is the display name for the Template and will be shown on the device in the list of templates to compose messages from and in message lists (unless overridden by the Title Template). |
| Description | A fuller description of the Template will be shown on some devices, space permitting, in the list of templates to compose mesasges from. |
| Root | Root Templates can be used to create new messages on the device. Messages that are not flagged as “Root” can be used for display only, as sub templates when creating a list card or targets for link commands. |
| Summary Template | This is a string which can be used to create a custom summary line for messages on the device. It can include fixed text as well as data from the message. Data items from the Message are inserted by placing the external label for that data item in the string between curly braces: Timesheet for {employeeCode}. The string can only contain data items from the root template (i.e. data cannot be included from sub templates). External Labels External labels are case sensitive. When referenced in summary templates inside
{...} their names must match exactly with their declared value in the Template. For example a field with external label employeeCode will not match a reference with value EmployeeCode. |
| Title Template | This is a string which can be used to create a custom title for messages on the device, the default is to the the Template name. As with the Summary Template field described above, it can include fixed text as well as data from the message. Data items from the Message are inserted by placing the external label for that data item in the string between curly braces. |
| Search Template | This is used to create a string which can be searched on. As with the Summary Template field described above, it can include fixed text as well as data from the message. Data items from the Message are inserted by placing the external label for that data item in the string between curly braces. Limited Feature This is currently only available on the iOS client when defining a search filter on list card items.
|
| External Label | This is the label that will be used when exporting messages to external systems e.g. the name of the XML tag. External labels External Labels and collection external labels need to be valid XML entity names. In principal this means using alphanumeric characters and no whitespace. To separate words you can use an underscore or camel case eg my_external_label or myExternalLabel. If you try to save a definition with an invalid label, Transsend will give you a validation error.
|
| Collection External Label | This is the label that will be used when exporting a collection of messages to external systems e.g. the name containing the XML tag. |
| External Name | Alternative unique name to reference the template by, versus the id, when using the API. |
| Tags | Tags enable a collection of Templates to be linked together and to be assigned to a user or group of users as a “set”. To add a new Tag, start typing the tag name. If the tag already exists it will appear in a list from which it can be selected, if it doesn’t exist then complete typing the tag and click the green “+” button to the right of the text box. The Tags assigned to the Template are shown below the Tag box. |
| ID | This is the unique identifier assigned to the Template by Transsend when the Template was first created. It is mainly used when referencing the Template in the API. |
Cards Tab
Cards correspond to screens on the user’s mobile device.
Tab Display
By using a series of cards it is possible to spread the data within a single Message across multiple screens, with relevant sets of data items to be grouped and captured together.
Every template needs to have one card identified as the root card. This card becomes the first one displayed on the device when creating or viewing a message.
A Template can include multiple Cards, so it is good practice to spread data items across a number of cards, and to group data items into logical groups (for example, a property assessment form may contain a Root Form for the overall property and lease information, along with a Form for each room type. Cards can be linked together using a “Link Command”.
Number Of Cards
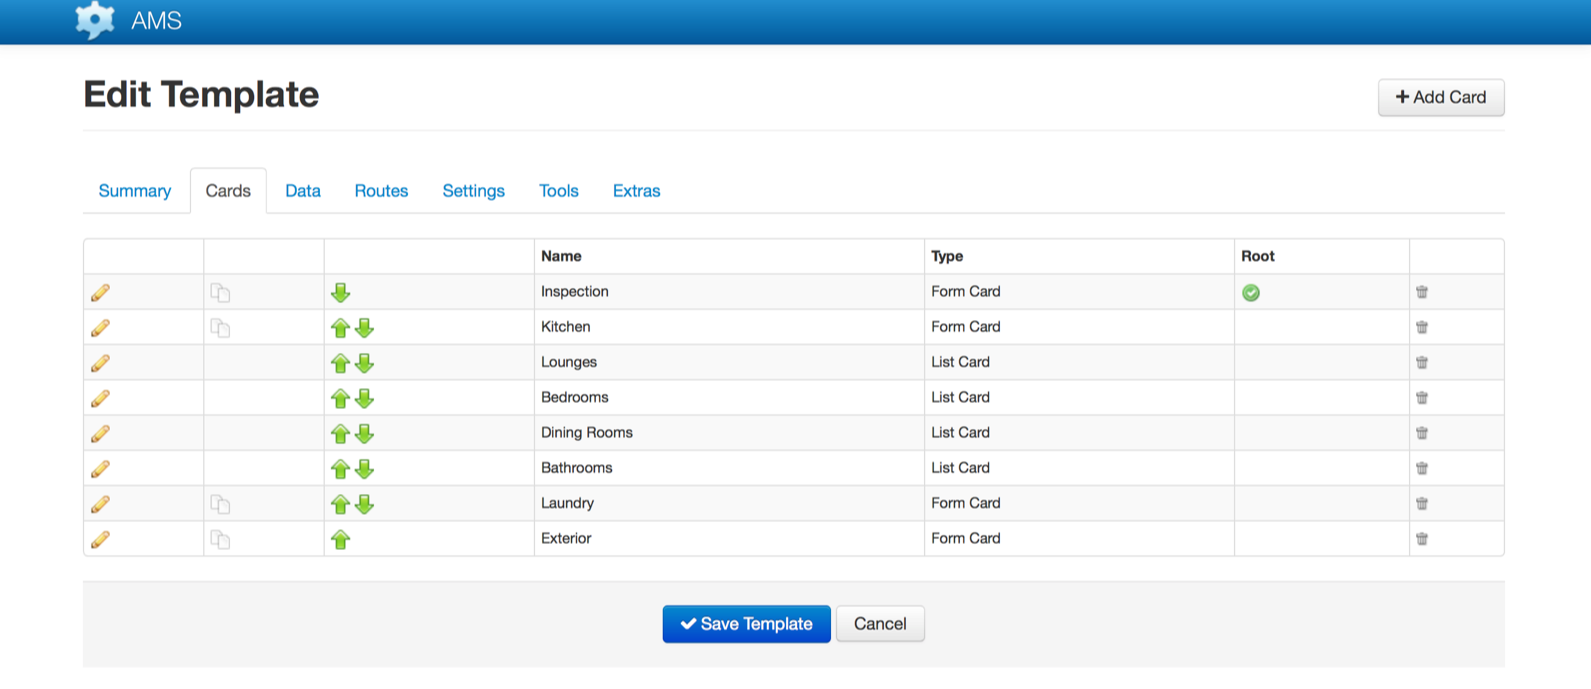
There are two types of cards, Form Cards and List Cards.
Form Cards
Form Cards contain fields and commands. Any number of fields and command items can be added to a Form Card and ideally should contain data items that are logically grouped together.
List Cards
List Cards can contain multiple entries of a sub template. If you were creating a timesheet type form you could use a list view for each of the entries rather than sending multiple messages. To use a List Card you need to select a non root Template for the type of entries that will be displayed. You will also need to specify an external label as List Cards are considered data items that contain a collection of entries.
For full details on Cards, refer to the Cards page.
Data Tab
Two types of Data can be added to a Template:
| Item | Description |
|---|---|
| Meta Data | By defining data (Meta Data) within a Template it is possible to include hidden data within a Message. A common use of meta data is to include data about the user (e.g. their name, staff identifier, email address), the organisation (e.g. user’s branch, location or team) or other data which can be derived from information “known” by the template. |
| Default Data | Default Data allows the configuration of default data values that will be used to populate data items with the Template’s cards. Default data can also be obtained from the mobile account level. This allows user-specific data to be pre-populated into a Template. Refer Mobile Account Default Data for further details. |
Routes Tab
Routes allow you to convert messages into documents or push received messages automatically to another server.
Routing within Transsend controls the processing of messages sent to the Transsend message gateway from users’ devices. Transsend routes allow incoming messages to trigger workflow actions and to be converted into a range of formats as they pass through the Transsend gateway.
The most common use of routing is to convert a message into a format such as a Word, PDF or Excel document and send it to an email address.
Another example of a route is the creation of an XML message from incoming message data and sending the XML on to an external system. This can be used as an alternative to the Web Service API in certain situations.
For more information see the Routes section of the Developer Guide.
Settings Tab
There are a range of settings for a template that allow you more control over messages on the device and when they pass through the gateway.
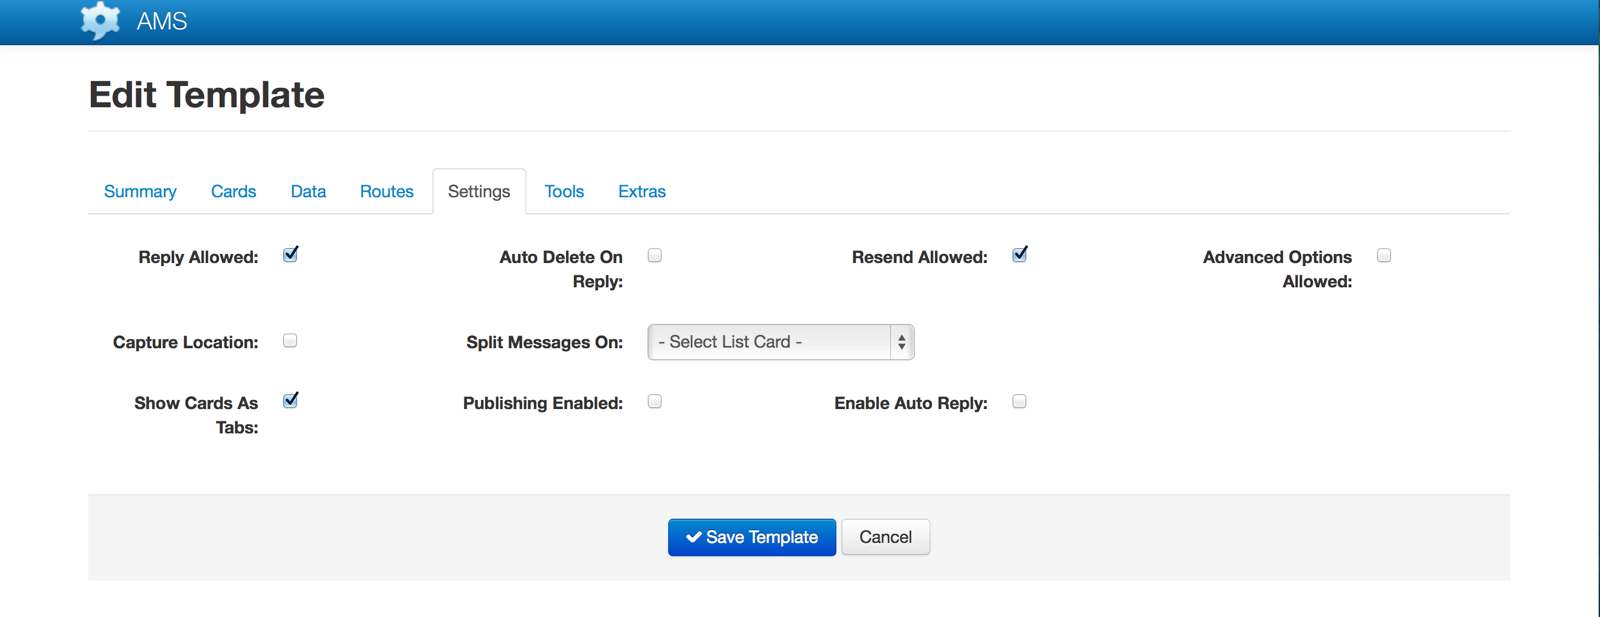
Reply Options
There are two reply options.
| Name | Description |
|---|---|
| Reply Allowed | Instructs the device to display the ‘Reply’ command for received messages. |
| Auto Delete On Reply | Cause the device to delete the original message once the reply has been sent. |
When a message is replied to it’s id is associated with the new message. This id is available on the web, in Routes and when messages are exported via the API.
Resend Option
When Resend Allowed is checked the Transsend Mobile App will display a ‘Resend’ menu option when viewing a message that has already been sent. After selecting this option a new message will be created with a copy of the data from the original, already sent, message. This new message will have a different id than the original and all values can be edited before the new message is sent. A ‘resend’ flag will be available on the web, in Routes and when messages are exported via the API.
Advanced Options Allowed
When this option is enabled you can move the send command from the root card to any other card in the root template for a message. This can be useful if you are creating a wizard style message where the user steps through the screens completing information and you want the send option to be on the last step.
Capture Location
On supported devices this will trigger the collection of the current location of the device using GPS, if available, when a message for this template is sent. It has a timeout and will eventually send the message if it can’t get the location.
Publishing
Template publishing allows you to maintain two copies of your template, a live one and a test one. This can be very useful when you have a live deployment but want to make changes without affecting your users.
To enable publishing for a template tick the ‘Publishing Enabled’ checkbox in the Settings section then save your template.
To create a live version, edit the template and click the ‘Publish’ button. Until you do this, the template will not be available to your users. If you are enabling publishing for an existing template that is already in use, after saving the change in settings, immediately edit the template and publish it as this will create a copy of the template in its current state and prevent untested changes from being made available.
To test a template before publishing the changes you need to enable ‘Test Mode’ for a mobile account. This will allow devices using that account to see unpublished versions of assigned templates.
Note that to receive the unpublished versions you will need to update the templates on the device.
Any templates that do not have publishing enabled will not appear in the template list on the device when ‘Test Mode’ is on.
Tools Tab
| Name | Description |
|---|---|
| Word Merge Field Template | Download a sample Word document containing all possible mail merge fields. |
| Sample XML | An example of the XML format for messages of this type, useful when developing with the API. |
| Reset Ids | Only use when directed by Transsend support, designed to fix internal ids under certain scenarios. |
Word Merge Field Template
Click the “Download” button to download a Word document pre-populated with the data items from the current template, incorporating the field names and external labels. This is a good place to start in creating a transformation document as part of a Route.
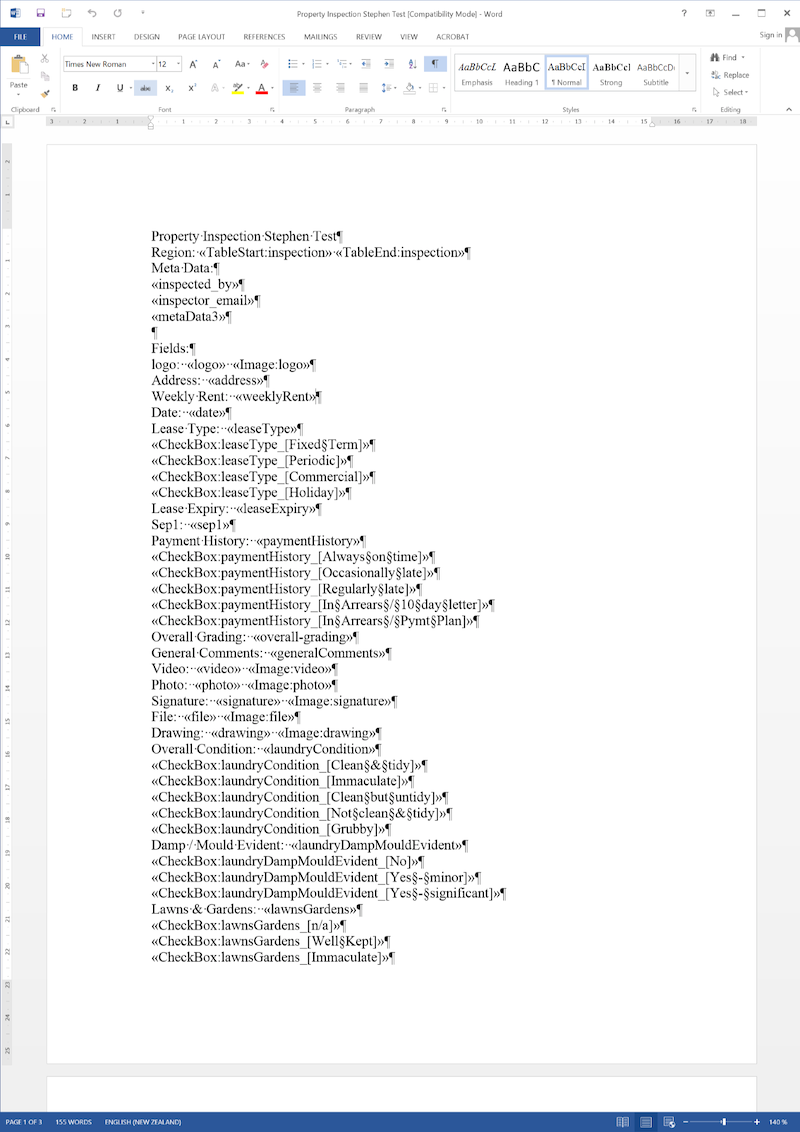
The following screenshot illustrates a sample template and generated automatically by Transsend: