
Introduction
Routing within Transsend controls the processing of messages sent to the Transsend message gateway from users’ devices. Transsend routes allow incoming messages to trigger workflow actions and to be converted into a range of formats as they pass through the Transsend gateway.
The most common use of routing is to convert a message into a format such as a Word, PDF or Excel document and send it to an email address.
Another example of a route is the creation of an XML message from incoming message data and sending the XML on to an external system. This can be used as an alternative to the Web Service API in certain situations.
Routes can only be enabled for Root templates and are created and managed in the Edit Template section of the Transsend web application.
Each root template can have one or more routes defined, with routes being able to operate on messages in both directions, i.e. as they are received from devices or sent out to devices.
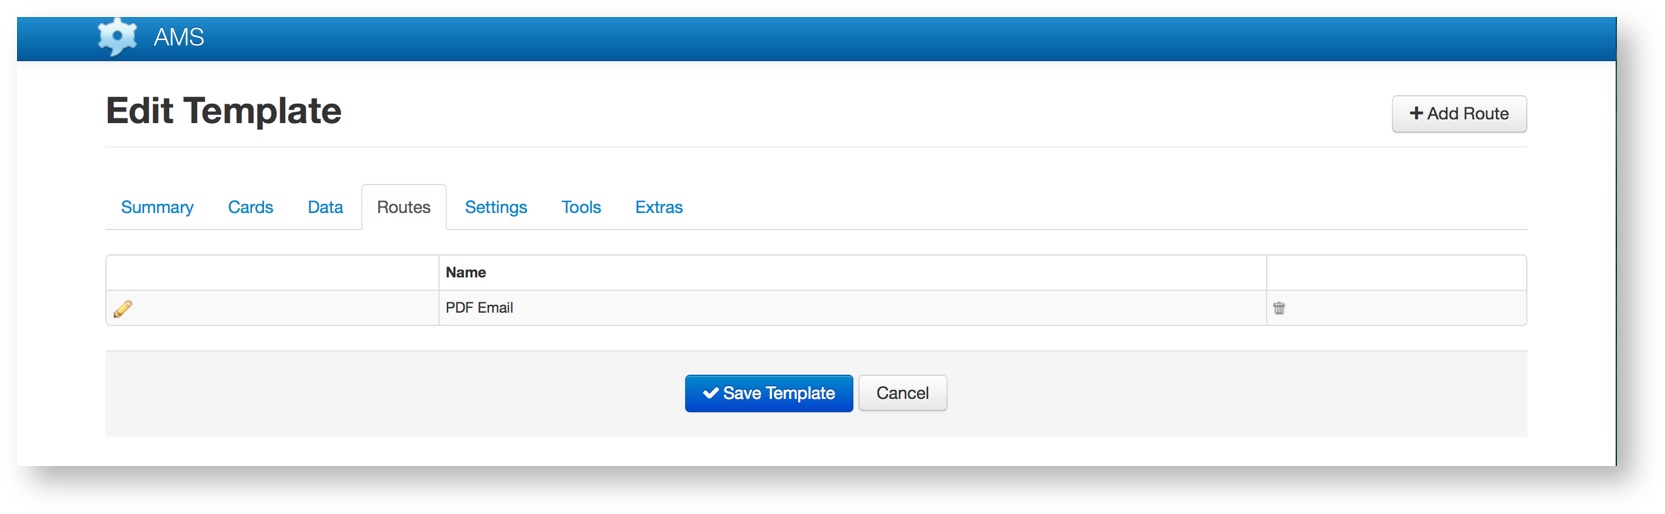
The following screenshot illustrates the list of Routes associated with a Template:
There are three types of routes:
| Type | Description |
|---|---|
| Standard | This is where a route processes one message at a time |
| Timer | The route operates on all messages that match the conditions set according to a timer expression, e.g. run every Friday at 5pm. |
| Limit | The route operates on all messages that match the conditions set according to the a specified number that have arrived or been sent since it was last run. |
Route Settings
A route is defined by a series of settings, including type, direction, some options, an optional condition, zero or more transformations and one endpoint. The route direction controls when a route is applied. Routes with direction ‘IN’ will apply to messages received from a mobile device while ones with direction ‘OUT’ will apply to messages sent to a mobile device.
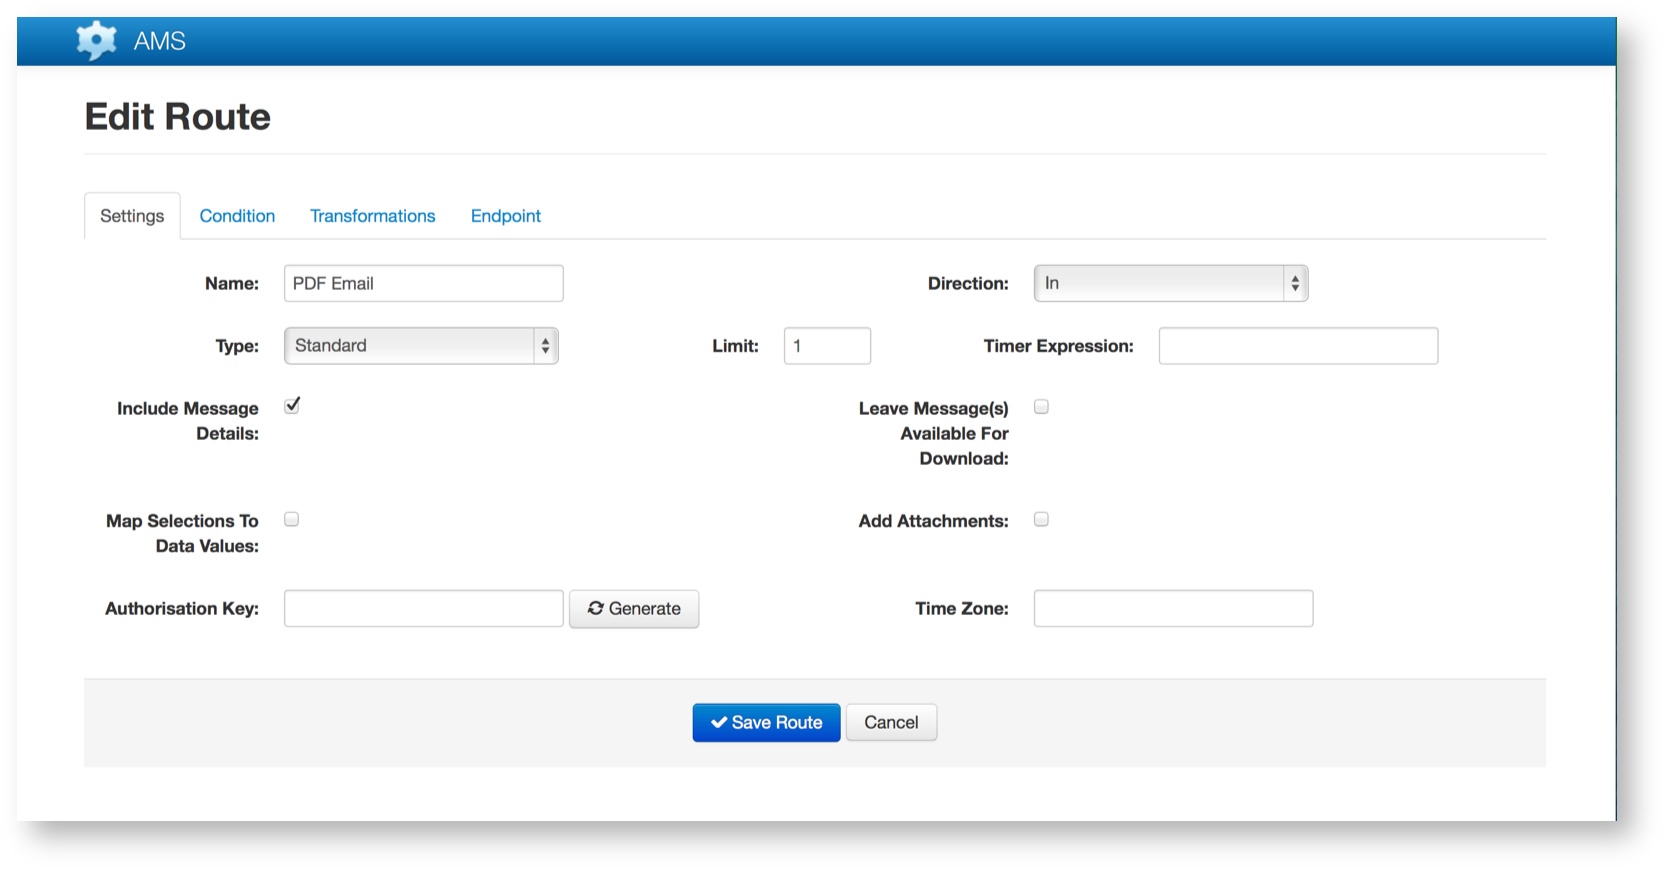
Route options include:
| Item | Description |
|---|---|
| Name | The name of the route. This is only used to help differentiate between multiple routes for a single template. |
| Type | The type of route (Standard, Timer or Limit). See above for more details. |
| Direction | Identifies the type of messages (direction of travel relative to the device) to which the route is to be applied. The options are those being sent from the device (in) or those being received by the device (out). |
| Limit | Only applicable to Limit the routes. This is the minimum number of messages that must have accumulated before the route will fire. For example a Limit route with a direction of “IN” and a limit of 100 will fire once 100 messages have been received.Note that when a Limit route fires, the route is applied to ALL available messages, which may include more than in the Limit. For example, if by the time a route is completed processing more than 100 messages have been received, then all messages that are available will be processed. |
| Timer Expression | Only for routes of type Timer. The cron timer expression to be used to calculate the trigger time for the route. When the route is triggered all eligible messages for the route will be processed. For example if the route is of direction IN and the timer is set to process messages every Friday at 5pm then it will process all messages received for this template since last Friday at 5pm. |
| Include Message Details | Enable this option to have messages include extra meta information, such as their ids, mobile account details, timestamps and location information. See the Message Details page for further information. |
| Leave Message(s) Available For Download | Enable this option if you also want to download messages for this template via the Web Service. If this is not enabled for any routes in a template then once all routes have been processed the message will have a status of ‘Routed’ and not be available to download via the ‘GetMessages’ operation from the Web Service. |
| Authorisation Key | An optional string, typically a GUID/UUID, that will be hashed and included with the route data. This can be useful for extra authentication when using the HTTP endpoint. The ‘Generate’ button will just create a random UUID. To learn more about using authorisation keys for verification see Verifying Hashed Auth Keys |
| Time Zone | The timezone that should be used for any timestamps. The default is UTC. |
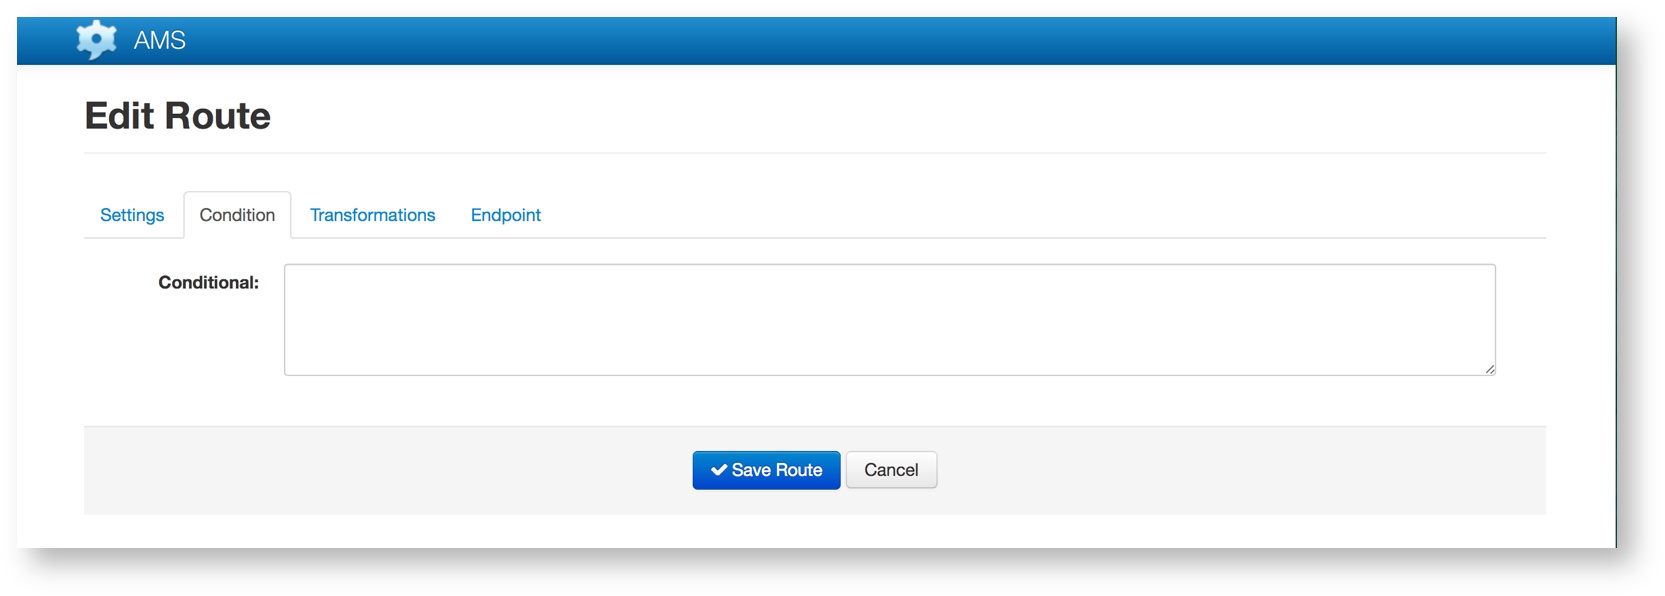
Conditional Routes
The conditional for a route is a set of rules that must be true for all messages being processed by the route. This allows you to define multiple routes for a template but only have some, or none, of them fire for their eligible messages. Some use cases involve emailing a report to a different location if a particular values has been set in the message, perhaps a priority setting.
Route Transformations
The message(s) being processed by the route can have their data transformed into different values and/or formats.
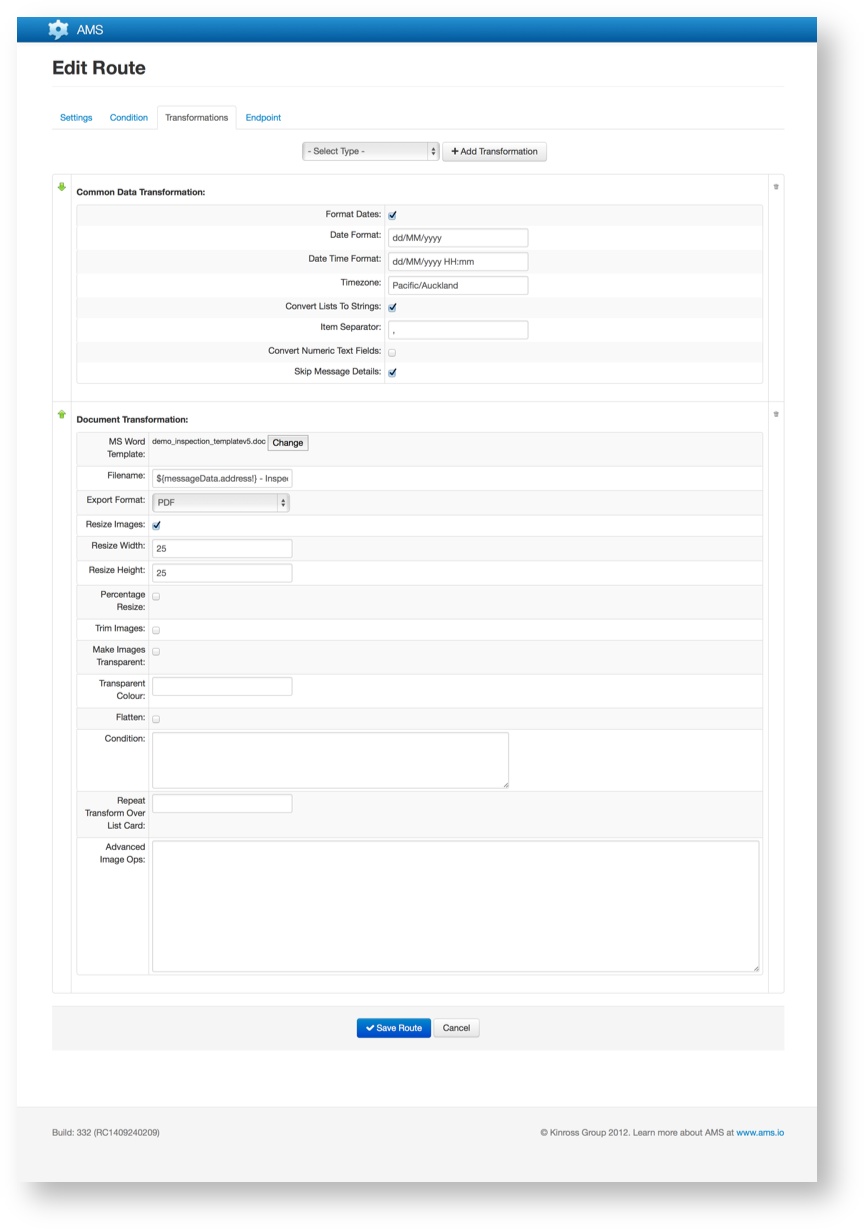
| Transformation Type | Description |
|---|---|
| Common Data | This transformation allows you to apply commonly used formatting options to the messages data. For example timestamps can be converted into properly formatted text and choice groups can be converted to comma separated text. See the Common Data Transformation page for further information. |
| XML | This transformation converts the message content into XML using the configuration information from the template. There are different versions of the XML transformation. Version 1, sets the value of multiple select choice groups to a comma separated list of values inside a single XML tag. Version 2, sets the value of multiple select choice groups to multiple XML elements as children under a parent element that has the name set to the external name of the multiple choice group field in the template. |
| XSL | This allows you to apply a XSL transformation to XML content. It can only be used after a XML transformation. |
| Excel | This allows you to create a Microsoft Excel XLS workbook document from a document template. The template itself is created in Excel and you insert special template tags to place the message content. For more information about creating the templates see jXLS . |
| Document | This transformation allows you to create a Word or PDF document. See the Document Transformation page for more information. |
Routes Endpoints
An Endpoint is a destination for the route data, for example email. There can be only be one endpoint for each route.
| Endpoint Type | Description | |
|---|---|---|
| HTTP(S) | This endpoint allows you to send message content to any HTTP or HTTPS URL visible from the web. The content is sent in an HTTP POST. Typically used for send XML or JSON but documents can be included as well. | |
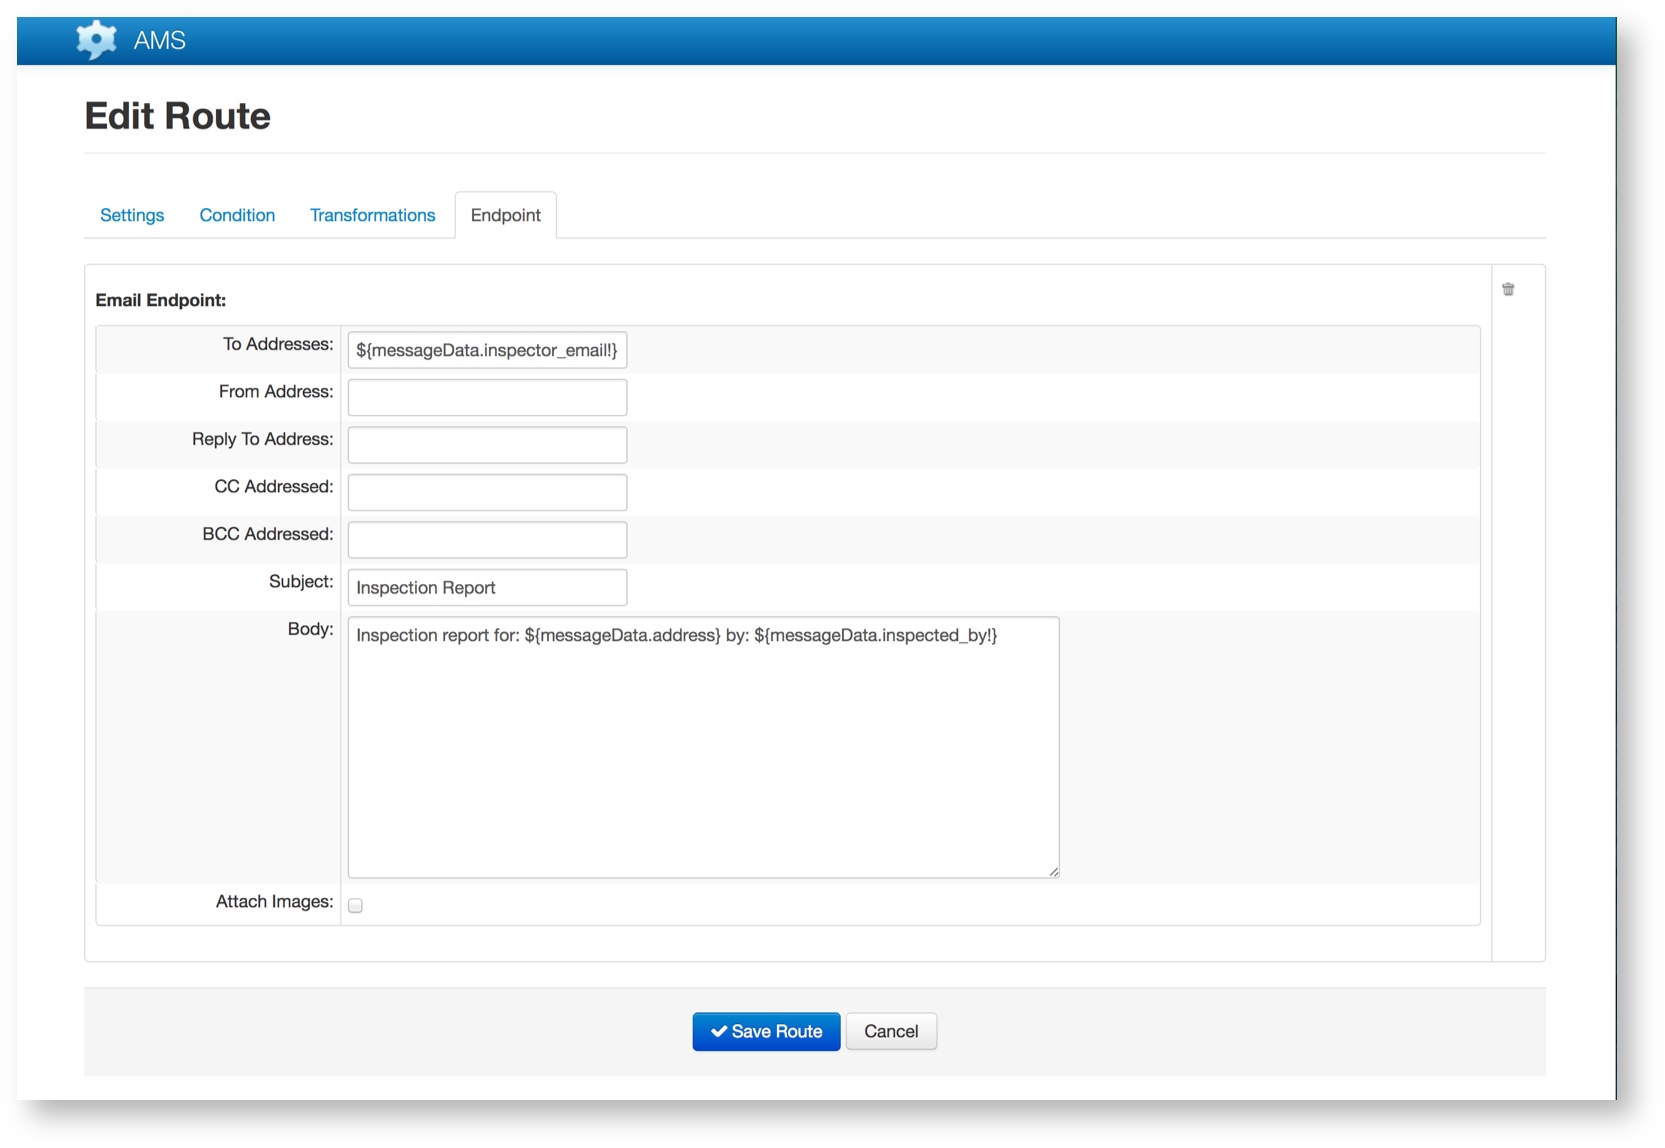
| This endpoint allows you to send the message content as an email. The delivery address can either be static or derived from the content of the message itself. The body of the email can contain dynamic content from the message which is set using the FreeMarker template language. If a document transformation has been performed it will be attached to the email. See the Email Endpoint page for more information. | ||
| View | This endpoint allows you to send the message data into an Transsend View. Normally you would only want to use this type of endpoint for standard, or single message, routes as the data from all messages will be accumulated in the View. Also a Common Data Transformation will make using values for date and choice group fields much easier to access and should generally be added but no other transformations should be used. The only option for the endpoint is to select the name of the View that is the target for the message data. There is no requirement for a View to receive data from only one template so it is possible to feed data from routes for different Transsend Templates into a single View. | |
| Transsend | This endpoint allows you to create a new Transsend message of the same type. |
Dropbox
There are two parts to using Dropbox with Transsend. Currently we support sending files generated via Routes into folders in Dropbox.
The first step is to authenticate Transsend against Dropbox and to enable the ‘Transsend Mobile’ Dropbox App.
- Login into Transsend.
- Select Account Settings from the top left.
- Select the Settings tab.
In the Dropbox section down the page:
- Click ‘Connect to Dropbox’. This will open new window. Login to Dropbox if needed,then ‘Allow’ Transsend Mobile as an App.
- Copy the generated token from Dropbox and paste it into Transsend where it says ‘Enter Code’.
- Click Finish
- You should now see a long authentication code.
- Click Save to commit the changes.
The second step is to setup or modify a Route in a Template.
- Edit the Template you want to use Dropbox with.
- Go to the Route you want to use.
- Create or Delete and Create an Endpoint of type ‘Cloud File Storage’.
- Optionally enter a value for the path. This is the folder you want the files to be uploaded into. This value takes a Freemarker template so you can generate folders based on content in the message. For example it could be:
inspections/${(messageData.client.name)!}
It can also be blank in that case files will appear in the Apps / Transsend Mobile folder in Dropbox. Note that the path is relative to Apps / Transsend Mobile and to have sub folders use at the ‘/‘ character.
If you have trouble seeing the Apps folder on your Computer check dropbox.com to see if it is listed there first. Transsend Mobile should be inside that folder.